I used to only enjoy arancini balls when dining out—they were one of those crispy, cheesy indulgences I always looked forward to. But once I had to go gluten-free, they became one of those “off-limits” dishes I really missed. So, I decided to start making them at home. They do take a bit of effort, with a few steps to prep and fry, but trust me—they’re absolutely worth it. Golden and crunchy on the outside, creamy and cheesy on the inside, and totally gluten-free… it’s comfort food at its best.
what are arancini?
Arancini are Italian rice balls that are typically stuffed with cheese, then coated in breadcrumbs and deep-fried until golden and crispy. They’re made with risotto-style rice, which becomes creamy and stuffed with cheese and formed into balls. The name arancini means “little oranges” in Italian, inspired by their round shape and golden colour once fried. They’re often served as appetizers, perfect to elevate date night at home.
ingredients
Here are the ingredients you will need to make these.
- Chicken Broth
- Butter
- Onion
- Salt (or omit if your chicken broth is heavily salted)
- Arborio rice
- White Wine (not necessary, you can just add more chicken broth)
- Parmesan Cheese
- Mozzarella Cheese
- Gluten Free Flour (I prefer using Bob’s Redmill 1-1 Flour)
- Eggs
- Gluten Free Bread Crumbs (I prefer to use PC Gluten Free Bread Crumbs)
- Vegetable Oil for frying
- Tomato sauce to accompany them once they are ready to eat
Storing
If you’re making a big batch (like I do!), the best way to store them is before breading:
To Freeze (Before Breading):
I like to double the batch and shape all the arancini ahead of time. Once they’re formed (but not yet coated in breadcrumbs), I place them on a parchment-lined baking sheet and freeze until solid. Then I transfer them to a freezer-safe bag or container. When you’re ready to enjoy them, just thaw slightly, roll in gluten-free breadcrumbs, and fry or bake as usual.
To Store Cooked Arancini:
If you’ve already fried them, store any leftovers in an airtight container in the fridge for up to 3 days. Reheat in the oven or air fryer to get that crispy texture back.
Gluten Free Arancini
Ingredients
Risotto
- 4 Cups Chicken Broth
- 4 tbsp butter
- 1 onion – diced finely
- 1 ½ Cups Arborio Rice
- 1 Cup White Wine (Sub for extra chicken broth if you do not want the wine)
- ½ Cup Finely Grated Parmesan
- ¾ tsp Ground Black Pepper
- 2-4 Cloves Garlic, minced
Filling
- 18 Cubes Mozzarella Cheese
Breading
- 2 Eggs
- ½ Cup Bob’s Red Mill 1-1 Gluten Free Flour or Adent Mills Gluten Free Flour
- 1 Cup Gluten Free Bread Crumbs
Instructions
Risotto
- In a sauce pan, heat up chicken broth until hot.4 Cups Chicken Broth
- In a large frying pan, heat up butter until melted.4 tbsp butter
- Add in finely chopped onion. Sauté until translucent.1 onion – diced finely
- Once ready, add in the minced garlic until aromatic.2-4 Cloves Garlic, minced
- Add in the Arborio rice and sauce for 2-3 minutes.1 1/2 Cups Arborio Rice
- Add in the wine and stir together.1 Cup White Wine
- As that mostly cooks out, pour in some chicken broth until just covered. Cook it until it is almost all cooked out and add another 2 rounds of this. When it is almost cooked out, test some to ensure it is al dente.
- Add in the pepper and Parmesan cheese.1/2 Cup Finely Grated Parmesan, 3/4 tsp Ground Black Pepper
- Stir to combine everything.
- In a baking pan, cover it with parchment paper. Pour the cooked risotto onto the pan and smooth it out. Cover it in plastic wrap. Place the pan in the freezer for 30-45 minutes. This will allow you to handle it and create balls. If you pull it out and it is still warm, put it back in the freezer longer.
- Remove the pan from the freezer and uncover it. Cut it into 18 equal squares. Cut the mozzarella cheese into cubes. Remove one of the squares (It will likely not stay in shape), place it in your hand, add a piece of cheese. Cover the cheese with the risotto. Ensure it is fully covered and roll it into a ball. Set aside. Do the same for the rest.18 Cubes Mozzarella Cheese
- Put the balls back into the freezer for 30 – 45 minutes.
- Heat up some oil for frying them. I set the temperature around 350F.
Breading
- While we wait for the balls to freeze, arrange 3 bowls. 1 with 2 eggs that you scramble. 1 with the flour and 1 with the gluten free bread crumbs. Set aside until you are ready.2 Eggs, 1/2 Cup Bob’s Red Mill 1-1 Gluten Free Flour or Adent Mills Gluten Free Flour, 1 Cup Gluten Free Bread Crumbs
Frying
- Once the balls are frozen. Remove the amount you could like to eat. I package up the rest in a freezer ziplock bag and put back in the freezer for the future.
- Take one of the balls, dip it into the flour and ensure it is fully covered. Then drench it in the egg mixture until it is fully covered. Then into the bread crumbs. Set aside. Do the rest with the rest of the balls.
- Once the oil is heated up to the correct temperature, drop them one by one into the oil. It will take about 6-8 minutes to cook. The outside will be golden brown.
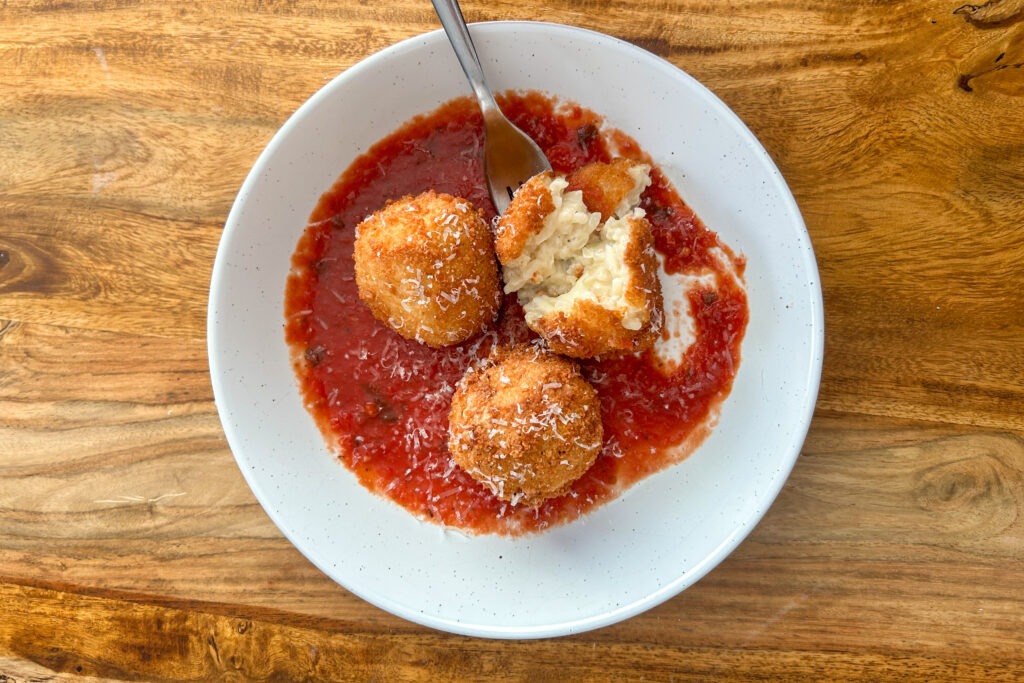
- Remove from the oil, and put on a metal grate (cookie cooling rack) over a baking sheet to allow for it to drip off and stay crispy.
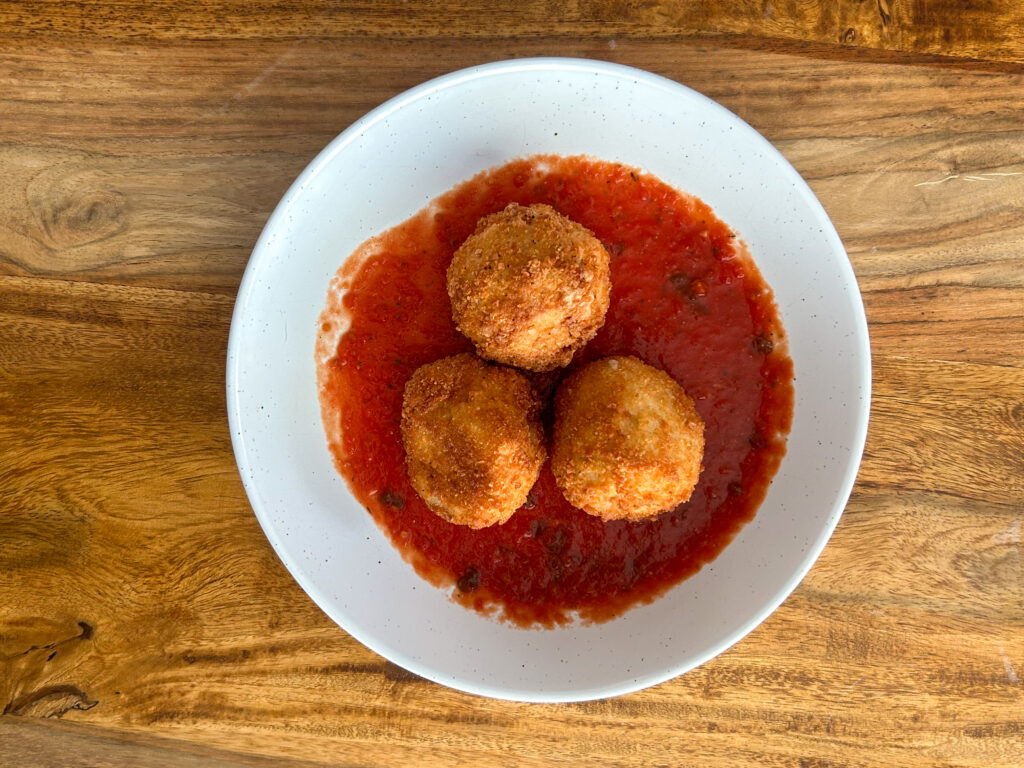
- I add a little bit of tomato sauce in the bottom of my plate and then add the balls on top with a little bit of Parmesan cheese. Enjoy!
Did you make this recipe?
Lovely. Now let me know how you liked it and how easy it was to bake. Tag @laurabakesglutenfree on Instagram and hashtag it #laurabakesglutenfree.
While I have you here, may I suggest few you try next:
Until next time. Keep following and commenting. Join me on Instagram, where I will be revealing my secret tips and tricks! Yes, that’s right!