

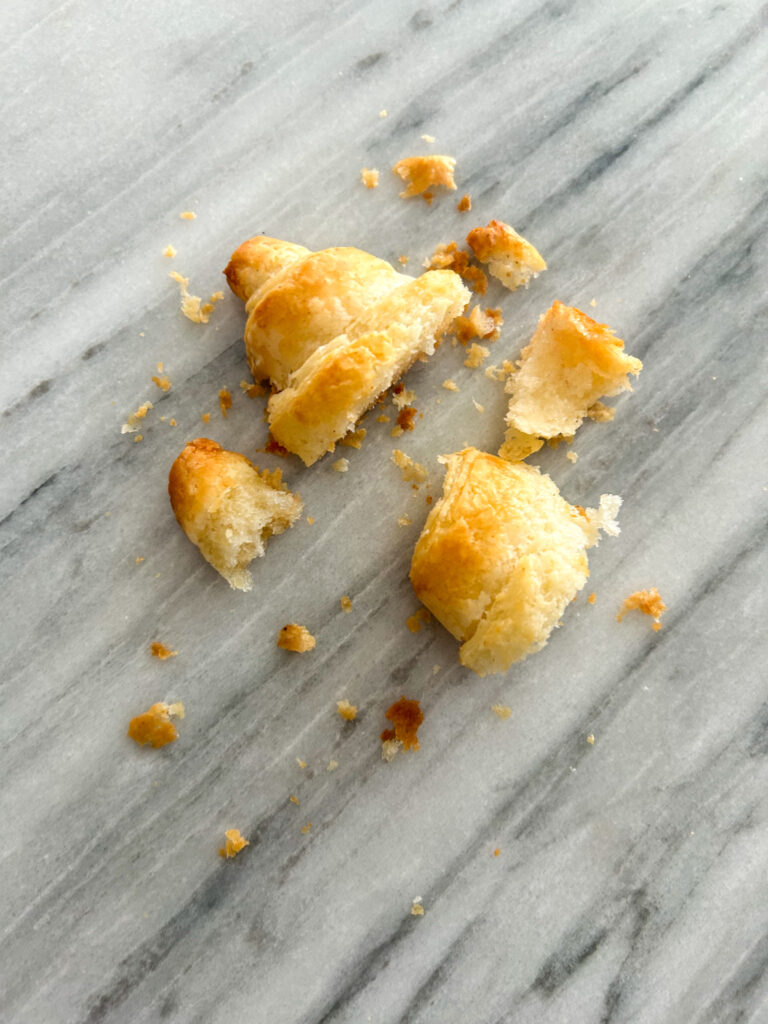
I became obsessed after my husband enjoyed a croissant breakfast sandwich at an Italian cafe the one morning when we were out for a coffee date. I needed to create a gluten free croissant that was buttery, flaky and exactly how I remember them. These homemade croissants do have a lot of steps, but it is worth it.
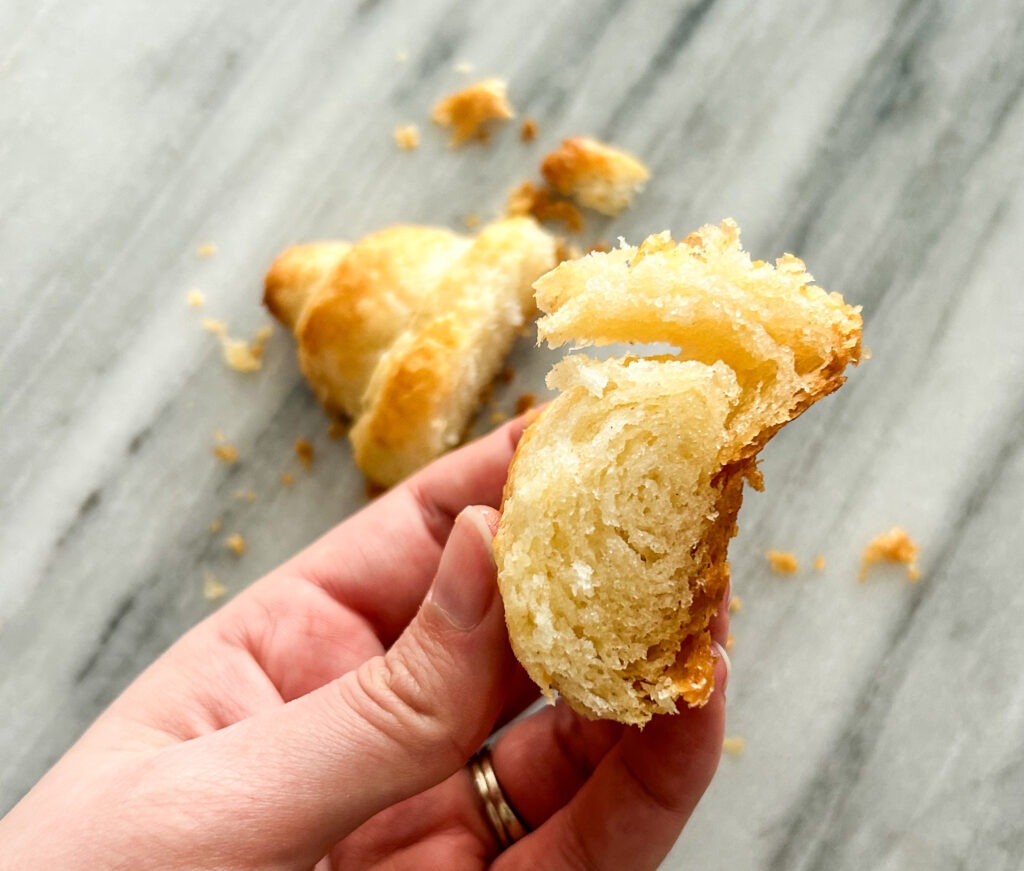
I spent the next month creating these gluten free croissants at every chance I got. I tried it with regular yeast, and then found that my local grocery store was selling fresh yeast. This made a world of difference because I didn’t need to worry about the moisture to activate the yeast. I tried different flours, different combinations, different butters – all with various results. I then found the below combination and was hooked! Flaky, buttery and delicious.
Fresh yeast
Using fresh yeast is not something that is common for a home baker to encounter. It is what bakeries use to create some pastries and bread. I found it was a bit hard to find at the local grocery stores on the shelves. The smaller local grocery stores with a bakery section bake with fresh yeast and they sold me some of their supply. I have also found it at Italian grocery stores in the fridge section by the butter. Other names for fresh yeast is bakers yeast or cake yeast.
Fresh yeast needs to be used quickly as it has a shelf life of about 2 weeks. You do not need a lot of yeast in this croissant recipe, however it is a great opportunity to make a double batch and freeze some croissants, or swap it out for instant yeast in any other recipe you have. If you usually use instant yeast in a bread recipe, triple the amount in weight and that will be the amount of fresh yeast that you use.
So, why use fresh yeast in this croissant recipe? Fresh yeast is preferred in croissants for its superior leavening power and ability to produce a light, airy texture. Its live, active cultures react quickly with the dough, resulting in the distinct flakiness and rise characteristic of authentic croissants. Additionally, fresh yeast contributes to the flavour profile, enhancing the overall taste experience of these delicate pastries.
I cannot find fresh yeast, what do I do? That is okay, I have made this recipe with traditional yeast before and it works out fine. You would reduce the amount of yeast you are using to 6 grams of traditional yeast, and bloom it the same way as the recipe.

Butter
I have tried this recipe with different kinds of butter. Just your cheapest butter from the grocery store and also grass fed butter that is rich fat resulting in bright yellow colour. There are a couple noticeable differences, one being the water content. The cheap butter has more water content in it, so I find it isn’t as flexible as the grass fed butter. Flexible butter is important so when you are creating layers they do not split the butter which distributes your air pockets. Both have a delicious buttery flavour, but I will admit, the grass fed one tasted more buttery and rich is flavour you expect from a traditional croissant. I would use this butter once you have had practice as it is more expensive.
If you are using the cheaper everyday butter in your croissants, I would ensure that your butter plaque is pulled out when your dough is resting. That way it is flexible but still cold.
Flour
I know the Caputo Gluten Free flour is going to be controversial because it is made with gluten free wheat starch, but it truly is the best flour for gluten free croissants. I have tried other combinations, 1-1 flours and they turned out more like crescent rolls. Nothing compares to the flaky, and soft texture the Caputo flour creates in these delicious gluten free croissants. This flour is not good for anyone with a wheat allergy, however it is perfectly safe for someone who is celiac.
Tools
- Wire Cooling Rack
- Oven Mitt
- Rolling Pin
- Rolling Mat
- Croissant Pan
- Silicone Pastry Brush
- Glass Mixing Bowls
- KitchenAid Stand Mixer
- I use a pizza wheel to cut the dough, but you can use a sharp knife, or you can get croissant cutters for an accurate cut every time.
Tips and tricks
Rolling and shaping this dough takes practice. You need to roll quickly and avoid putting your hands too much on the dough as you will warm up the dough. However you don’t want the dough too cold, or it will break and bleed the butter out as you need a good seal.
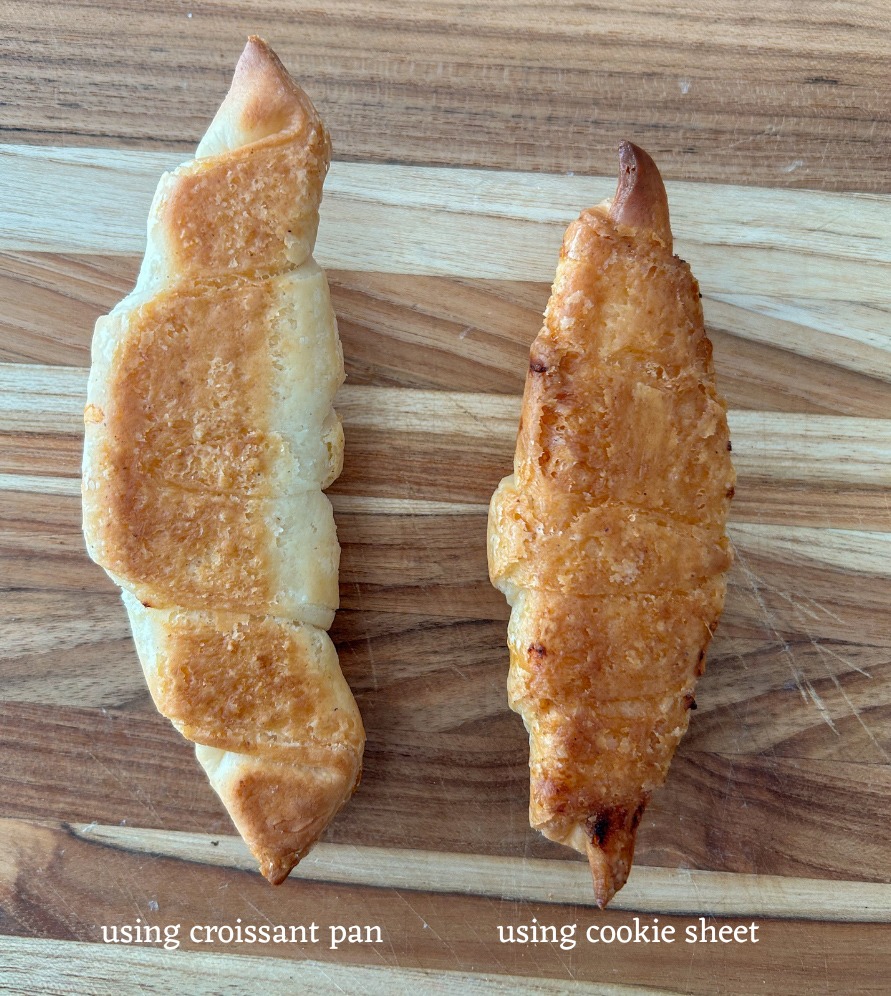
I found putting them on a regular cookie sheet was making the bottoms cook too fast. I purchased a croissant pan and it made a huge difference. The pan is like a cookie sheet, but has a bunch of holes.
variations
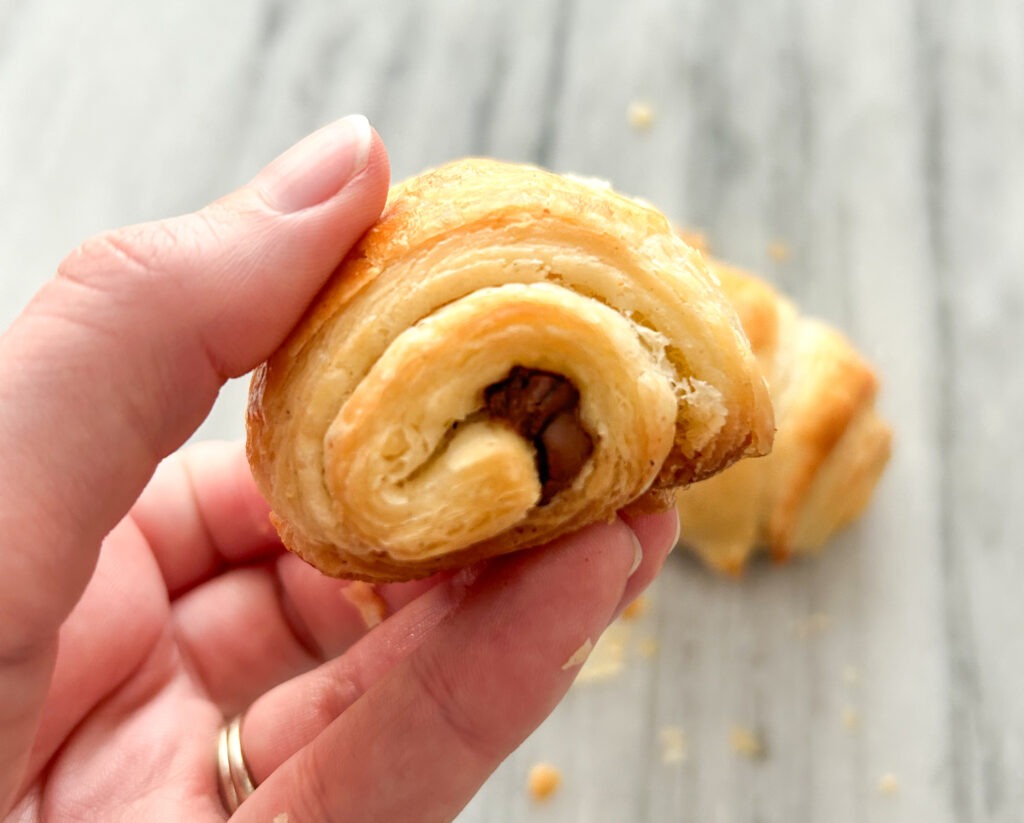
You can use this recipe and cut them into rectangles, stuff them with chocolate and have chocolate croissants. What is more delicious than chocolate AND flaky croissants.
Gluten free Croissants
These croissants are best eaten the day you make them. However if you store them in a zip lock bag or air tight container they will be just as delicious. I find by day three that I need to freshen them up in the oven for a couple of mins.
Enjoy these gluten free croissants and let me know how they turned out!

Gluten Free Croissants
Ingredients
Butter Plaque
- 165 grams Butter
Dough
- 18 grams Fresh Yeast
- 75 grams Warm Water
- 53 grams Caputo Gluten Free Flour
- 30 grams Butter – Softened
- 21 grams Sugar
- 4 grams Salt
- 240 grams Caputo Gluten Free Flour
- 94 grams Milk
Egg Wash
- 1 Egg
- 1 tbsp Milk
- 1 pinch Salt
Instructions
Butter Plaque
- Weigh out the butter and place it into a larger freezer sized ziplock bag.165 grams Butter
- With your hands on the outside of the ziplock bag, squish down the butter into one corner of the bag. You need to make a 5” x 7” rectangle of butter. Once it is roughly into shape, take your rolling pin and roll it across to make it evenly spread into the 5” x 7” shape.
- Zip the bag up, and place flat into the fridge.
Dough
- Combine fresh yeast and warm water into a bowl. Using a fork mix it together until it dissolves.18 grams Fresh Yeast, 75 grams Warm Water
- Add in the Caputo flour to the yeast mixture and mix together. It will be the consistency of pancake batter.53 grams Caputo Gluten Free Flour
- Cover the bowl with plastic wrap. Place bowl in the oven (NOT TURNED ON) and turn on the oven light. Leave in there for 45 minutes.
- Once the yeast mixture is ready and has bubbled/doubled, proceed to the next step.
- In a stand mixer bowl, combine butter, sugar and salt. It will come to a paste, and there shouldn’t be any loose sugar/salt.30 grams Butter – Softened, 21 grams Sugar, 4 grams Salt
- Add Caputo Gluten Free flour, and milk to the butter mixture in the stand mixer bowl.240 grams Caputo Gluten Free Flour, 94 grams Milk
- Add yeast mixture to the stand mixer bowl.
- Turn on the stand mixer to combine all the ingredients together. There should not be any loose flour. If it is not combining, add a splash of water and let it mix. Do not add to much or the dough will be too sticky.
- Once all ingredients have mixed together. Let the mixer run for 5 minutes to make a smooth dough.
- Take the dough out of the stand mixer bowl and shape it into a ball. Place the dough ball into a bowl and cover with plastic wrap.
- Place the bowl in the oven (NOT TURNED ON) for 30 minutes.
- Take the butter plaque from the fridge and place on the counter.
- Once the dough has proofed, lightly dust your workspace with some additional Caputo Gluten Free Flour. Roll the dough out to 8” x 11”.
- Cut the butter plaque bag open, and place the butter onto one side of the rolled out dough and ensure it is not touching the edges.
- Cut the dough in half, so it makes a 8” x 5.5” shape. Put the side that doesn’t have the butter on top and put it on top of the butter. Crimp the edges to ‘seal’ the butter in.
- Using your rolling pin, press the dough to laminate the dough to the butter.
- Roll out the dough to 8” x 20” rectangle.
- Trim the short ends.
- Bring one side into the middle and then the other side into the middle. Both cut edges should join each other in the middle of the dough.
- Fold the dough in half again. This will make the middle seam the fold seam.
- Push the rolling pin on the dough to seal it together. Roll the dough out to 8” x 20”.
- Trim the short ends.
- Fold the dough into a letter.
- Roll the dough to 9” x 18”.
- Trim the short edges.
- Cut into triangles. I cut mine into 12 triangles to get smaller croissants. However you can cut them into 6 triangles to make large croissants.
- Cut a small slit into the flat edge of the croissant.
- Pick up the triangle and stretch it slightly.
- Cut the triangle down, and push out the slits slightly and roll the croissant together.
- Place the rolled croissant on a sheet pan with parchment paper.
- Repeat until all croissants are completed.
- Cover them loosely with plastic wrap. Place into the oven (NOT TURNED ON) and turn on the light with the door slightly propped open. Let proof for an hour.
- Remove the croissants from the oven and place on the counter. Preheat the oven to 425 degrees.
Egg Wash
- Once the oven is preheated, remove the plastic wrap from the croissant
- Mix together egg, salt and milk in a bowl.1 Egg, 1 tbsp Milk, 1 pinch Salt
- Using a pastry brush, brush the egg wash over each of the croissants. Be careful as they will be delicate.
- Bake for 16 minutes.
- Rotate baking trays and then bake for another 3-5 minutes until golden.
- Once they are baked, let them cool on the sheet pan for 10 minutes before transferring to a cooling rack.
- Enjoy!
I want to make these gluten free croissants but I do not have the skills – what should I bake instead? One of my favourite recipes to enjoy while having a morning coffee has to be my gluten free white chocolate raspberry scones.
Did you make this recipe?
Lovely. Now let me know how you liked it and how easy it was to bake. Tag @laurabakesglutenfree on Instagram and hashtag it #laurabakesglutenfree.
While I have you here, may I suggest few you try next:
- Gluten Free Cream Puffs
- Gluten Free Thumbprint Cookies
- Gluten Free Butter Tarts
- Chocolate Chewy Caramels
- Gingerbread Chewy Caramels
Until next time. Keep following and commenting. Join me on Instagram, where I will be revealing my secret tips and tricks! Yes, that’s right!

2 Comments
Pingback: 12 Gluten Free Savory Bread Recipes Your Family Will Beg You to Make Again
Pingback: Top Gluten Free Flour Blends in Canada (Tried & Tested) - Laura Bakes Gluten Free